Tools can be accessed from the Space Panel, or by right-clicking in the viewport and then left-clicking to select the desired tool.
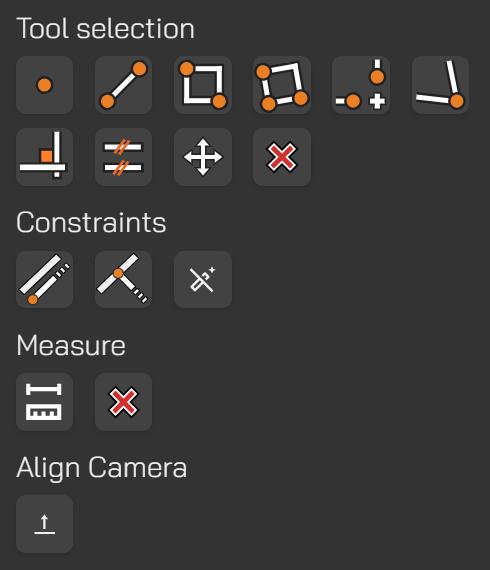
Tool Selection
Point
Inserts a point at the clicked location in the viewport.
If the point is placed on an existing line, that line will be split into two segments.
Line
Creates lines by left-clicking to place the start point, dragging to the desired position, and left-clicking again to place the end point.
The tool remains active and displays a preview of the next line segment as the mouse moves.
Right-click or press Escape to cancel the tool.
Hold Shift to create a line colinear with the previous segment.
Hold Ctrl to create a line perpendicular to the previous segment.
Guide line snapping can also be used if enabled.
Rectangle
Draws a world-axis-aligned rectangle by left-clicking to define its two diagonal corners.
Right-click or press Escape to cancel the tool.
3-Point Rectangle
Creates a rectangle using three points. The first two points define an orientation line, and the rectangle is drawn parallel to that line.
Right-click or press Escape to cancel the tool.
Extend
Extends the first selected line to meet the second selected line.
If the intersection lies on the extensions of both lines, both lines are extended to form a corner at the intersection point.
If the intersection lies on both existing line segments, both lines are split at the intersection point.
If the intersection lies on the second line segment but not on the first, the first line is extended to the second and the second line is split at the intersection point.
Right-click or press Escape to cancel the tool.
Corner
Creates a corner between two lines and removes their extensions.
Lines are selected by left-clicking, and the side of each line that is clicked will be kept.
Right-click or press Escape to cancel the tool.
Make Perpendicular
Makes the second selected line perpendicular to the first selected line.
Left-click to select the first line, then hover over the second line to preview the adjustment.
The side of the second line that is clicked will be moved.
Right-click or press Escape to cancel the tool.
Make Parallel
Makes the second selected line parallel to the first selected line.
Left-click to select the first line, then hover over the second line to preview the adjustment.
The side of the second line that is clicked will be moved.
Right-click or press Escape to cancel the tool.
Move
Left-click to select the line or point you want to move, drag to the desired location, and left-click again to place it.
Right-click or press Escape to cancel the tool.
Delete Entity
Hover over the line or point you want to delete and wait for it to highlight.
Left-click to confirm deletion.
Deleting a line endpoint will remove all lines that share that endpoint.
To delete a node located along the middle of a line, hold Ctrl before clicking.
Right-click or press Escape to cancel the tool.
UNDO
Ctrl + Z
Hold Ctrl and press Z to undo the most recent action.
Each additional press of Z while holding Ctrl will undo the previous action in sequence.
Constraints
Draw Parallel
Used to draw a line or 3-point rectangle parallel to an existing line.
Select this constraint with a left-click, then left-click the line you want to remain parallel to. An infinite guide line will appear along that line.
Select the line or rectangle tool and draw using the guide.
To cancel the constraint, click it again in the Space Panel or from the right-click menu.
Draw Perpendicular
Used to draw a line or 3-point rectangle perpendicular to an existing line.
Select this constraint with a left-click, then left-click the line you want to remain perpendicular to. An infinite guide line will appear along the perpendicular direction.
Select the line or rectangle tool and draw using the guide.
To cancel the constraint, click it again in the Space Panel or from the right-click menu.
Enable / Disable Guidelines
When guide lines are enabled during drafting, snapping aids will appear while moving the mouse, allowing you to capture collinear or perpendicular constraints without manually enabling them.
To disable a constraint, click it again in the Space Panel or from the right-click menu.
Measurement Mode
Create Measurement
Creates point-to-point, point-to-line, and line-to-line measurements on the sketch plane.
Use left-click to select the entities you want to measure.
To deactivate the tool, click it again in the Space Panel or from the right-click menu.
Delete Measurement
Hover over a measurement and left-click to delete once it highlights.
To deactivate the tool, click it again in the Space Panel or from the right-click menu.
Align Camera
When clicking the Z-axis on the view manipulator to switch to a top view, the camera rotates to align with the world axes.
This option retains the current orientation while changing to a top view.